
Do you back squat?
Better question…
Should you be using a back squat in your training program?
The back squat, like the bench press and deadlift, is a heavily debated exercise.
Is it necessary for training?
Or does it pose too great of a risk for injury?
Now, if you look at a lot of training programs and a lot of fitness professionals, they’ll argue that a squat is one of the most foundational movements to any training program.
They’ll say it’s a necessity.
While the squat movement might be necessary for a program, that doesn’t mean that a BACK SQUAT has to be in your programming.
Sometimes, technique needs improvement.
Strength needs to be improved.
And you need to develop the confidence to load the bar.
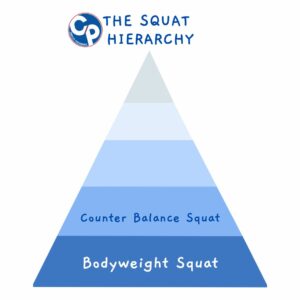
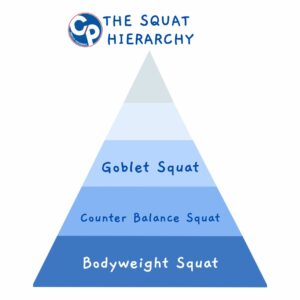
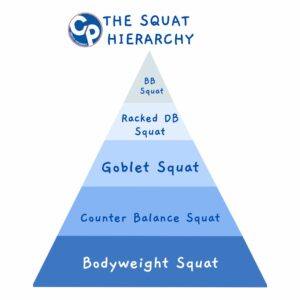
Which is exactly why the Squat Hierarchy was built.
(Please give credit where credit is due. I originally heard of the Squat Hierarchy from Coach Jordan Shallows.)
Level 1: Bodyweight Squat

At the bottom of our Squat Hierarchy is the bodyweight squat.
It’s the most basic, barebones version of any squat.
It is the exercise that teaches you:
- How to Achieve a Full Range of Motion
- How to Position Yourself to Prevent Injury, Aches & Pains
- & How to Get Stronger
Oh, and let’s not forget that it will set you up to establish the confidence that you can lift more than just your bodyweight.
At Complete Performance, we like to utilize our half-sized foam rollers as a measure for when MOST of our clients reach the full range of motion.
Set up the foam roller right behind you with your feet shoulder width apart.*
*Now, every squat stance is unique. One might require a narrower stance while another takes a wider stance. One individual might angle the toes out and the other stands with them straight on. (CLICK HERE to find out your squat stance!!)
Back to the squat…
Lower the hips straight down to the bottom of your squat by opening the hips. Then, while keeping the chest up, drive through the floor to stand back up.
It’s important to note that if you’re using a foam roller or chair to cue the bottom of your squat, you’re not sitting onto it but touching it.
Bodyweight squats should be utilized to develop base strength and set the foundation for any future weighted squat.
I recommend using this exercise in 10, 12, 15 or maybe 20 rep sets to build the endurance at the end range of motion.
Common mistakes I see when it comes to bodyweight squats:
#1 Knee Valgus: The inward collapse of the knee during any sort of weight bearing activity.
Remember that you want the knees to stay on the same path as your middle to third toe on the way down and on the way back up.
#2 Foot Pressure: Oftentimes when people drop into a squat, the weight shifts into the toes causing the heels to pull up off the floor. The goal is to keep the weight in the middle of the foot.
#3 Chest Positioning: During a shift in foot pressure, the hips tend to kick back and the upper back tends to roll forward. This makes the exercise a lot more about the knees and low back instead of the glutes, hamstrings and quads.
Level 2: Counter Balance Squat
Once you’ve measured the bodyweight squat, it’s time to move up to the next level of our hierarchy – the counter balance squat.
The counter balance squat is an excellent exercise to move into because the load stays light and works to establish strength and endurance in muscles for heavier loaded squats.
With the counter balance squat, you’re going to grab a plate or a dumbbell and extend the arms out in front of the body while lowering into the squat.
As the arms stay extended the whole time, the focus gets largely placed on the core.
This is a great exercise for:
- Building Strength (Especially in the core)
- Driving Out of the Bottom of the Squat
- Keeping the Chest in Position
Common mistakes I see with the counter balance squat:
#1 Dropping the Arms: This creates a swinging motion and does not create the same demand on the core.
#2 Bringing the Weight In: This also decreases the load on the core and simulates one of our alternative squat variations (Goblet Squat)
#3 Going Too Heavy: This is a base building exercise! Keep the load light and prioritize high-quality movement.
Level 3: Goblet Squat
At this point, you’ve mastered the range of motion and basic technique in the bodyweight squat. You’ve developed the core and glute strength in the counter balance squat.
Now, it’s time to add some load!
With the goblet squat, you need one dumbbell turned on its side to be held in front of the chest. Brace through the core and sit the hips down into a squat.
The biggest difference from the counter balance is that the weight is bulled into the body.
We’re prioritizing the lower body through this movement.
At Complete Performance, one of our favorite squatting variations is the goblet squat. It’s an exercise that you can continue to add load to without having to worry about technique or bar placement.
In our larger group sessions, it’s an exercise that the majority of our clients can execute with confidence.
Common mistakes I see with the goblet squat:
#1 Chest Positioning: When the weight gets heavy and individuals get tired, the dumbbell pulls you forward causing a rounding of the upper back.
#2 Foot Pressure: Oftentimes when people drop into a squat, the weight shifts into the toes causing the heels to pull up off the floor. The goal is to keep the weight in the middle of the foot.
The reason I love to use the goblet squat is because the dumbbell positioning can cue you on your chest position and foot pressure. If the dumbbell is swinging away from and into your chest, it’s a sign to focus on going up and down into the squat.
Level 4: Racked DB Squat

The next step is the racked DB squat.
You’ll notice with each of these levels, we’re changing the way the weight is loaded on your body so that you can continue to get ready for the back squat.
The racked squat is a great way to teach you to have that position of the weight loaded on your shoulders (comparable to a barbell) instead of in the front of the body.
A racked squat requires a dumbbell in each hand, resting the edges of the dumbbells on the shoulders.
You need to push the elbows up as you raise and lower the hips through the squat motion.
The racked squat is a great precursor to a barbell squat because you can keep the weight light to build strength while preparing to use a dumbbell.
Like the goblet squat, this is another exercise where you can really add and progress yourself by adding heavier load as you get stronger.
One of the big mistakes I see lies in the elbow position.
Many times, the elbows drift down to the sides, which puts a lot of stress on your elbows and wrists. Really push the elbows up to embrace the core, maintain chest position and stay focused on the lower body.
Now, technically our next level is “Barbell Squats,” but we’re going to separate this into the 2 primary styles of barbell squats.
Level 5: Barbell Front Squat
The barbell front squat has 2 different positions:
#1 Cross Over: In this position, you’ll place the bar on top of your shoulders with the arms extended out. Then, you’ll bend at the elbow to grab hold of the bar on the opposite shoulder (left hand holds over the right shoulder and the right hand holds over the left shoulders).
#2 Racked: In this position, you’ll hold onto the bar in your hands, place the ball on the tops of your shoulders and push the elbows up to secure the bar in place.
For beginners, I recommend the Cross Over position until you build the mobility and strength to attempt the Racked position.
It’s important to note that despite adding the barbell, the movement of the hips for the squat remains the same. The only change lies in the position of the load to vary the stress on the body.
Level 6: Barbell Back Squat
The barbell back squat is kind of the pinnacle of strength when it comes to squats.
To get into position, you’re going to come underneath the bar with your head and rest the bar on top of your shoulders.
Unlike the other squat variations, the back squat MIGHT call for a slightly more forward position of the upper body depending on your unique characteristics.
This is an exercise where you can build strength, but it should be known that technique and full range of motion remain the priority in the barbell back squat.
If you’re ready to get started and you’re looking for the training and accountability and the guidance to go with it, CLICK HERE to sign up for a FREE in-person or virtual trial workout to breakdown your squat technique, assess your goals, and build a program for you!


