
Ladies, listen up.
What’s the one area of your body you HATE more than anything?
YOUR TUMMY!
Sure, you wish you could give a little lift to that butt.
Suck up some of that cottage cheese in your thighs.
Trim down those wings underneath your arms.
But those areas are different for everyone…
The core, I think one of my teammates in college was the ONLY girl to LOVE her core (and the only reason she did was because she’d lean way back and try to convince us there was nothing to pinch…).
Now, I’m sure like every other woman, you’ve tried darn near everything.
Sit ups.
Crunches.
Extreme dieting.
You name it.
But the one thing you have yet to try (unless you’re one of my current clients and still, you might not know you’re trying it) is the Core Training Hierarchy.
If you follow this Core Training Hierarchy, take it level by level, and work your way to the top exercises in this pyramid, you will have the leanest and sexiest core you’ve ever had in your life.
But before we dive into the Core Training Hierarchy, there’s an important gap that needs to be bridged.
You see, you as a client want something VERY different than what I, as a coach, want for your core.
As a client, you want to FEEL THE BURN and build the aesthetically appealing look you’re after (AKA 6-Pack or a flat, lean, and sexy belly).
As a coach, I want you to strengthen and build your core to improve your functionality in your day-to-day activities. That means improving your balance, stability, and strength to prevent injury.
So, how do we bridge the gap? How do we get YOU what you want while still helping you improve your day-to-day functionality and keeping you pain free?
It starts by building a better understanding of your core…
First, your core extends WELL beyond your tummy, and it is most definitely more than the classic “6-Pack.”
Within your core you have major and minor core muscles.
Your major core muscles include the following:
- Rectus Abdominus
- Obliques (Internal & External)
- Transverse Abdominus
- Diaphragm
- Erector Spinae
- Pelvic Floor Muscles
- Multifidus
Your minor core muscles include the following:
- Latissimus Dorsi
- Glutes (Primarily the Maximus)
- Trapezius
Now, flatter, leaner, and sexier abs don’t come from KNOWING the core muscles, but it is important you know that your core is pretty much everything from your neck to your butt.
Okay, so now that you know WHAT makes up the core, it’s important you know WHY we all strive to have a better core. Two reasons:
- We want to look very lean and aesthetic.
- We want to stop nagging, chronic low back pain.
The majority of clients have or have had tight hips and/or low back pain, and the majority of the time that comes from having weak abs and a weak erector spinae.
The cause?
Sitting, most often with bad posture.
Think about it.
You sit at a desk.
At home on the couch.
In the car.
EVERYWHERE.
That puts you in a constantly flexed position at the hip, which keeps hip flexors in a flexed and shortened position, and over time, creates more and more tightness in the hip.
Add to that the likelihood that you’re sitting with rounded shoulders and back, which adds NO firm support on the lower back.
NOBODY wants to live in pain, and it’s been proven time and time again that strengthening your core can help alleviate that.
Now, it doesn’t mean that you or others out there aren’t still chasing an aesthetically pleasing core but getting and staying out of pain is often more motivating long-term than aesthetics.
We’ve covered the WHAT.
We’ve covered the WHY.
It’s time to cover the HOW, which means it’s time to breakdown The Core Training Hierarchy.
This Core Training Hierarchy has been crafted, tweaked, and adapted by so many coaches throughout the years, but I’ve come to discover that they all practice the same principles for core training.
Every single version I’ve come across stresses the importance of training the core in a specific order of importance to safely and effectively train the core for true strength, functionality, and visibility.
Take a look at the Core Training Hierarchy, which outlines the principles of core training.
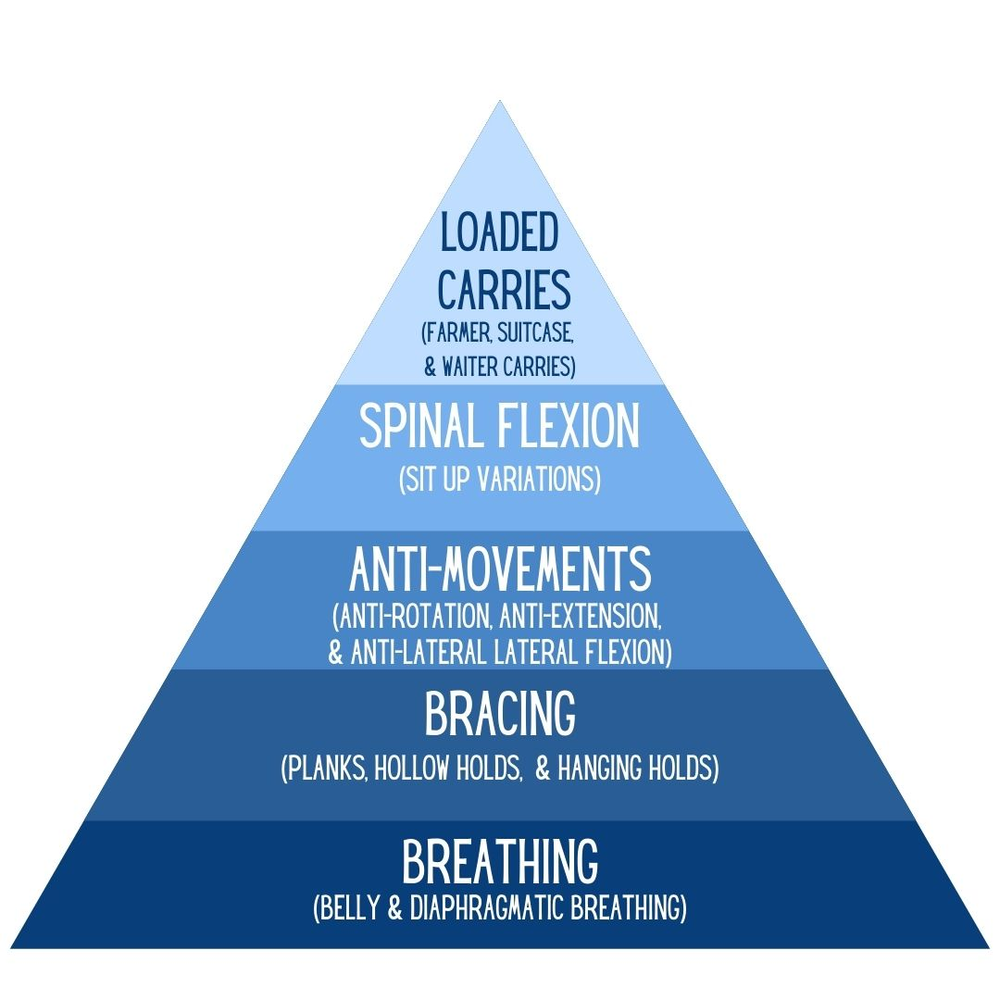
The pyramid is organized with the most important core principle at the bottom and the least important, or at better put as needing to be trained the least, is at the top.
Most people approach core training as wanting to train the outside FIRST, when in actuality, building the core starts from the foundation. The bottom layer of this pyramid (Breathing) is the most important thing and keeps the structure strong as we move up the pyramid.
You probably look at this pyramid thinking “I know how to breathe, so I can skip that one.”
I did too.
But once someone took me through what true diaphragmatic breathing looks like, my core was ON FIRE.
Here’s the thing, that doesn’t necessarily mean that if you haven’t mastered breathing that you can’t EVER have a plank, sit up, or loaded carry in your training session. It just means that if you want your core to be truly optimized, these are the principles used when you train it.
You see, this pyramid isn’t a game where you have to “LEVEL UP” to move on to the next types of exercises.
Every client is different.
Every situation is different.
It just means you need to learn, adapt, and do what works best for YOU!
To help that, here’s a breakdown of each level of the Core Training Hierarchy to provide some coaching cues and tips to help you master each level top to bottom.
Diaphragmatic Breathing

As we’ve already discussed, Breathing is the foundation of the pyramid because without it, the other exercises cannot be well supported.
Diaphragmatic Breathing is something that ALWAYS needs to be worked on because it’s a skill that can be easily lost without practice.
But here’s the thing, the practice of Diaphragmatic Breathing is not cool or sexy…
It’s results however, can be…
Here are some benefits of mastering Diaphragmatic Breathing:
- Improves Posture
- Works the Deepest Core Muscles
- Targets the CNS
- Strengthens the Pelvic Floor & Abdominals
- Releases Tension in the Chest, Shoulders, and Neck
Here’s how to execute proper breathing:
- Lie on the floor on your back.
- Put your feet up on the wall in a 90-degree position.
- Place the hands across the lower stomach to provide external feedback.
- Inhale very slowly, filling the pocket up against your hand. Imagine you’re breathing THROUGH your pelvis.
- Hold at the top for 1-2 seconds.
- Exhale out as slowly as possible – Exaggerate the duration of the breath.
- Pull your ribcage down towards the waistline as you exhale.
The last thing to talk about is HOW MUCH and HOW OFTEN.
Try this:
- Incorporate into your warm-ups.
- Perform anywhere between 5 to 10 reps
- Focus on elongating every single breath.
Bracing

Bracing exercises are your TOTAL core exercises.
These are the exercises that have by far the BIGGEST strength pay offs because the goal in every variation is to create tension in a stable position.
Bracing exercises include:
- Plank Variations
- Hollow Hold Variations
- Hanging Hold Variations
My favorite part about Bracing exercises is that they’re SO simple and require minimal equipment, which means when clients are looking for supplemental core work outside of the gym, these are the perfect options.
So why are Bracing exercises so important?
Your ability to hold a stable position while bracing or creating tension isometrically is a foundational exercise of the body.
It allows us to create internal tension.
It builds awareness of muscular contraction in the core.
It improves your ability to resist external movements or forces.
Most importantly, it improves your ability to stabilize and stay safe during heavy lifting (in life AND training).
Here are some cues to remember:
- Pull the ribcage down and towards the hips.
- Pull the pelvis towards the ribcage.
- Pull the belly button towards the spine.
- Squeeze the armpits and pull them towards the toes.
- Breathe deep through the core and brace all sides of the core.
- Squeeze the glutes (butt cheeks) to brace the lower back.
Now because of their simplicity, this is another exercise that can (and more many of us, SHOULD) be incorporated into training.
Because the body works to create isometric tension in the core regularly throughout the day, it’s a movement the body quickly recovers from, thus meaning overtraining is not too much of a concern (so long as proper technique is practiced).
Anti-Movement Exercises

Anti-Movement Exercises are those sexy exercises you see others do at the gym or online and can only HOPE to do someday.
They can have some MAJOR payoffs in terms of functional core strength, full body strength, and adding some definition to the core.
Anti-Movement Exercises are another form of bracing the core and creating extreme internal tension. The difference is that Anti-Movement Exercises use external movements or resistance to try and force you out of your stable position.
Think of these as a plank with a twist (literally and figuratively).
Now, there really isn’t a test that tells you whether or not to “Level Up” in the Core Training Hierarchy or not but moving from Bracing to Anti-Movement Exercises requires some level of proficiency.
Think of it this way, you wouldn’t want to do a difficult anti-rotation exercise, if you cannot plank for longer than 30 seconds with proper form.
Anti-Movement Exercises are so beneficial for their ability to strengthen your ability to brace against external forces. That means you’ll be able to create internal tension WITH isometric strength AND apply it to something attempting to force you out of that position and tension.
Now, these Anti-Movement Exercises come in so many different forms OUTSIDE of your typical core exercises.
Think Counter-Balance Squats, Offset KB Lunges, or a KB Ring Row.
None of these exercises directly emphasize the core, but the core is taxed as it tried to resist the force of the weight on a single side on the body.
My all-time favorite Anti-Movement Exercise is the Paloff Press. It’s a great isometric anti-rotation exercise that teaches you how to brace the core with resistance pulling you back one direction.
Check out these pictures.

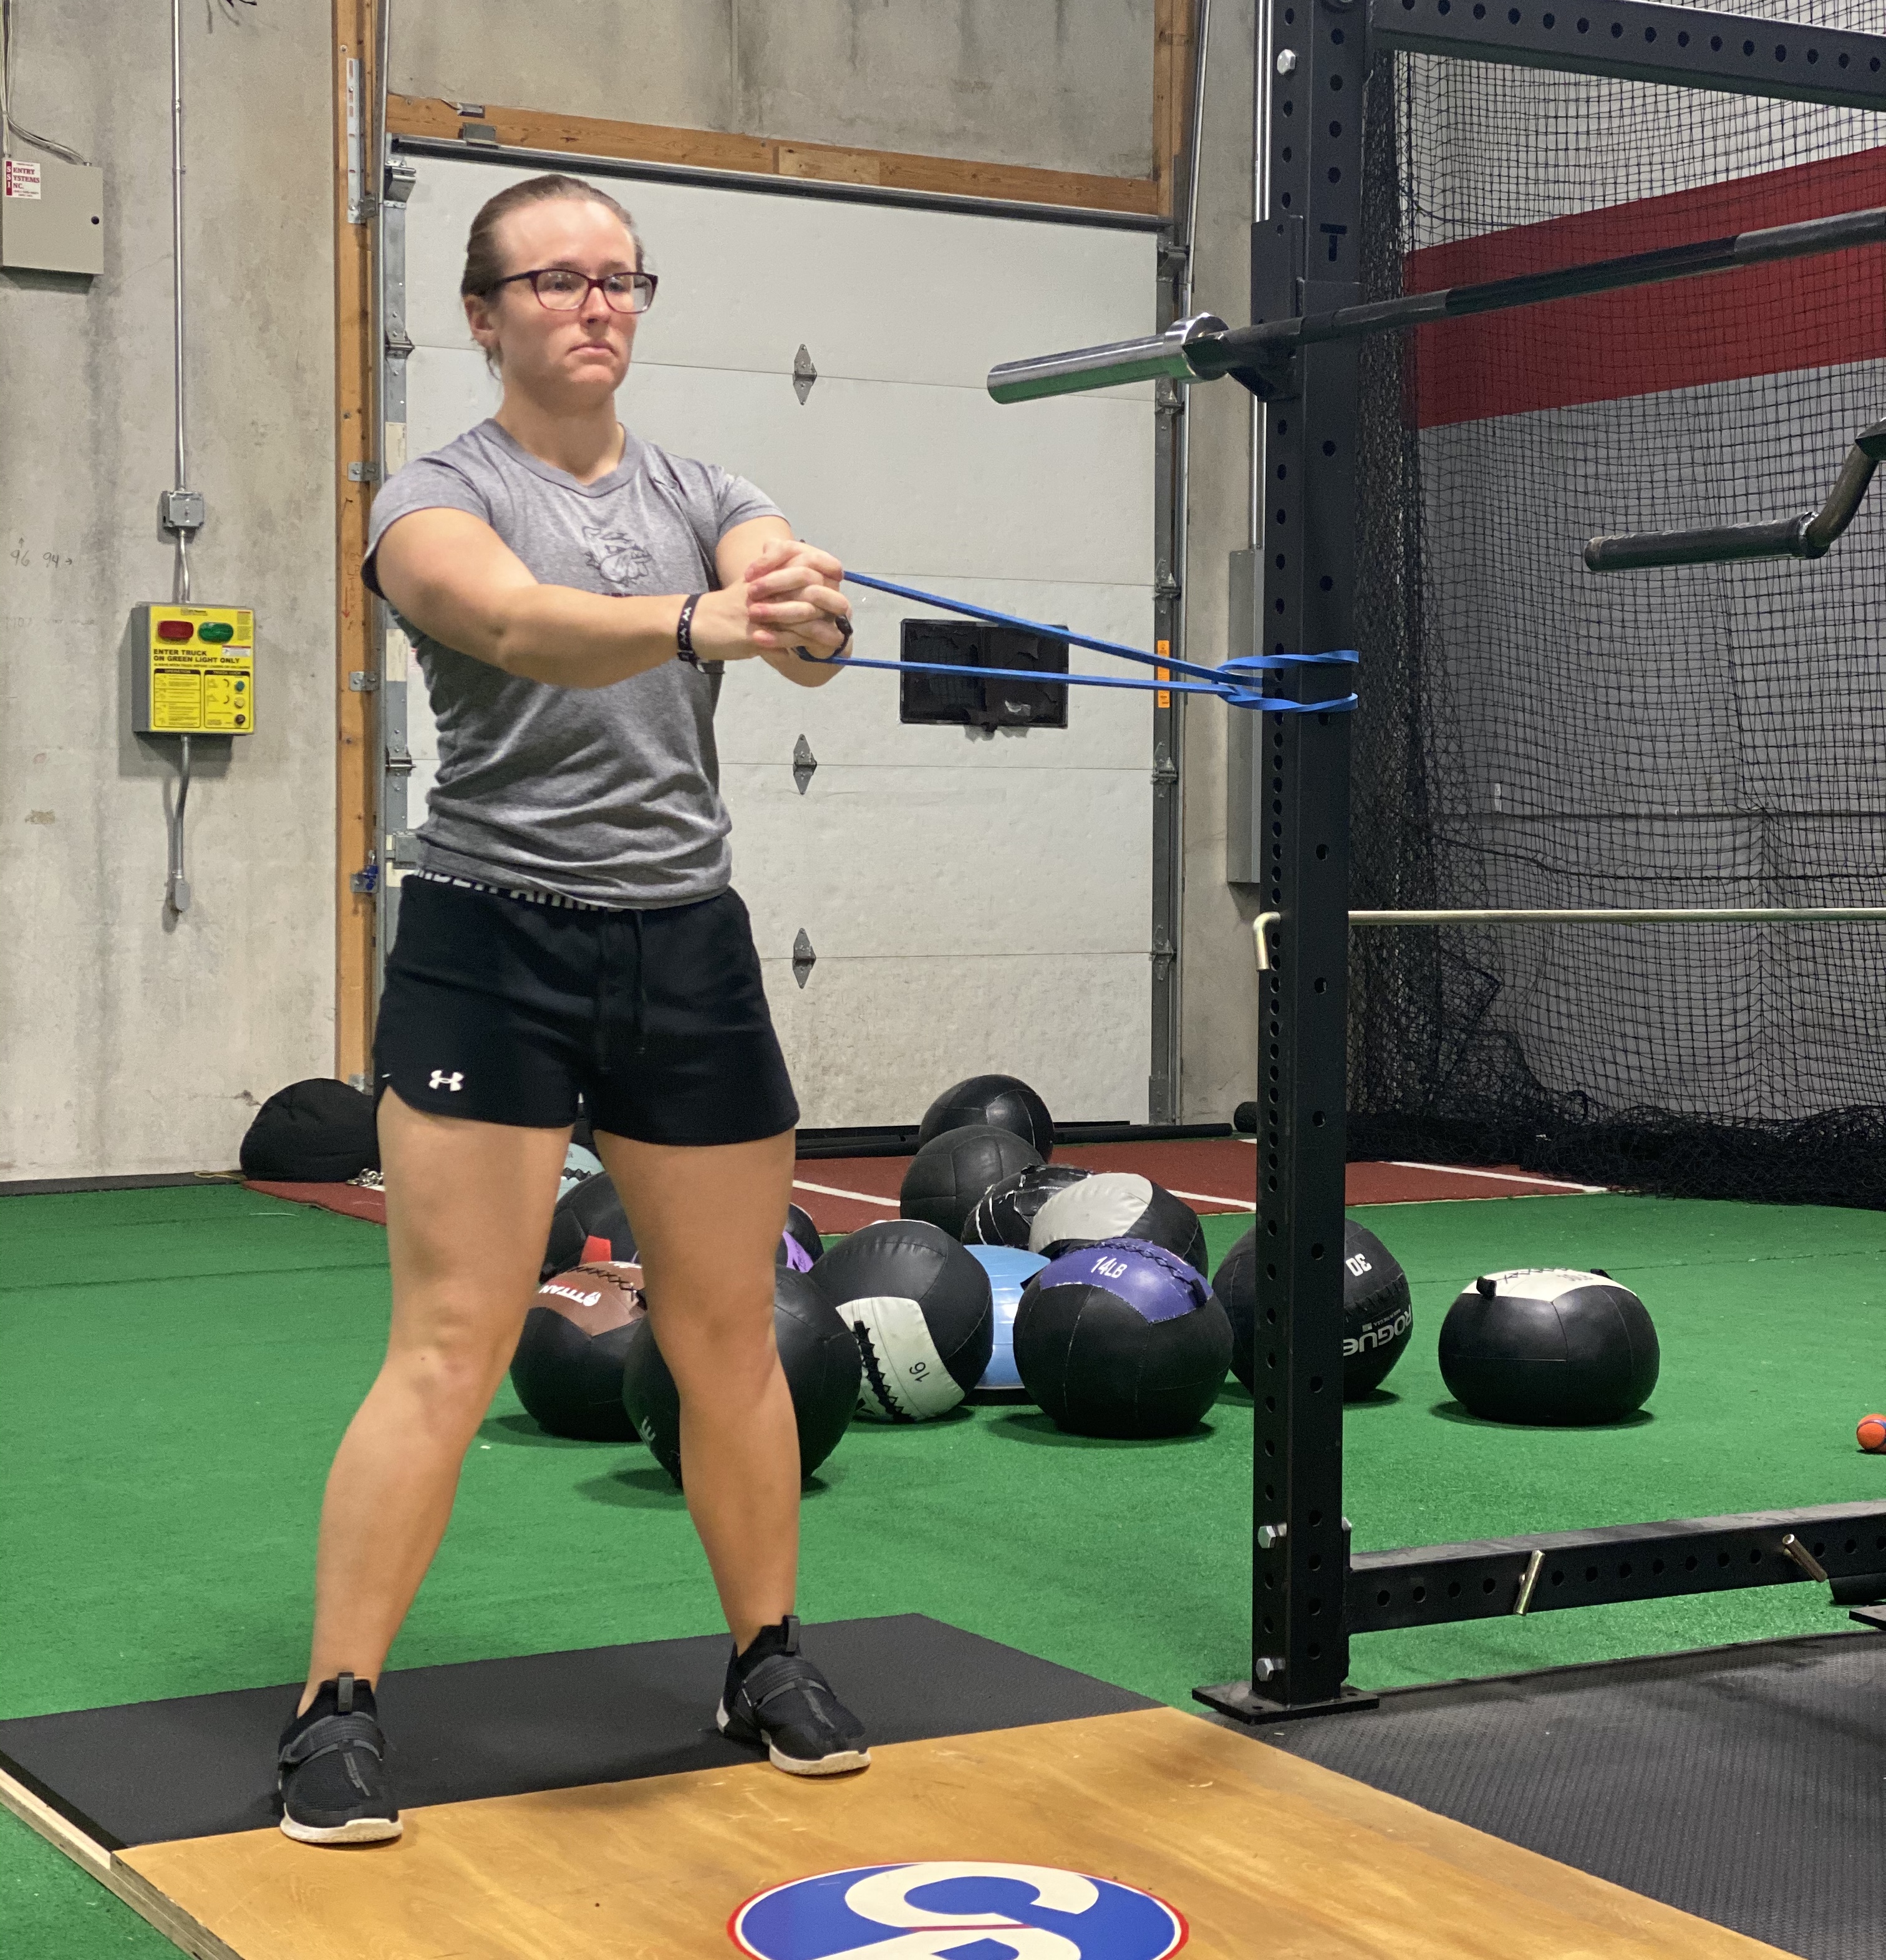
In the first picture, you can see I’m holding a band with both hands in front of the chest. My feet are set underneath the hips. While you can’t see it, I’m bracing the core by pulling the ribs down towards my hips, the belly button towards my spine, and the pelvis up towards my ribs.
In the second picture, I’ve pressed the band straight out. I’m creating a great deal of internal tension, and really working to maintain core tension to resist the pull of the band.
Typically, I like to breakdown Anti-Movement Exercises into 3 categories:
- Anti-Rotation: Paloff Press. Bus Drivers, or Landmine Rotations
- Anti-Extension: Ab or Stability Ball Rollout
- Anti-Lateral Flexion: Offset Lunges, KB Presses, Single Leg RDLs
When it comes to frequency, these don’t quite need to be trained quite as often as breathing and bracing. Typically, I recommend 1 or 2 times per week. As a client training 3 times per week, I typically program one of the three Anti-Movement Exercise variations per training session.
Spinal Flexion

THESE are the exercises you think about when you mention the core.
These are your sit ups, crunches, and leg raises.
It’s funny how often I have to convince clients that we did in fact work the core WITHOUT doing any of these.
There are 2 reasons Flexion Exercises are near the top of the pyramid:
- We don’t ACTUALLY need that many of them.
- We need a strong foundation to perform them properly.
Here’s what typically happens when people perform Flexion exercises – the spine never actually flexes during the sit up and one actually just uses whatever means necessary to sit up with the high likelihood that you hyperextend the lower back at the top of the movement.
When you do that, you don’t actually work your core…
Instead you just compress the spine and put yourself at risk for MORE low back pain.
That doesn’t mean Flexion Exercises aren’t necessary.
They absolutely are, so long as we perform them correctly!
Here are some tips for the next time you perform some sit ups:
- Pull the rib cage down towards the hips.
- Exhale as you tuck the ribs down.
- Keep the arms comfortably at the sides or crossed across the chest.
- SLOW DOWN.
These tips improve your mind-muscle connection into your abs and can really improve the effectiveness of your sit ups.
Now, regardless of how good you get in mastering the technique of Flexion Exercises, they aren’t THAT necessary for a flatter, leaner, and sexier core.
The rest of the pyramid does a great job of building a functional, strong, and aesthetically pleasing core.
But sometimes it offers peace of mind to clients AND it is important you learn how to properly flex the spine and create tension in that position.
Here are some of my favorite Flexion Exercises to program:
- Straight Leg Sit Ups
- Snail Sit Ups
- Leg Raises
- V Sit Ups
- Alternating Single Leg V Sit Ups
Loaded Carries

We’ve made it!
The top of the pyramid!
The most underrated section of the Core Training Hierarchy.
If you take anything away from this blog, I would love for it to be the understanding of just how crucial Loaded Carries are for your training program.
Loaded Carries are a GREAT core stimulator as well as a total body exercise.
Depending on the variation you choose, Loaded Carries can light up your shoulders, traps, rhomboids, lats, arms, and core (OF COURSE)).
Loaded Carries are an EXCELLENT fat loss tool. They’re considered to be the BEST core exercises for burning calories and losing body fat, which is another reason I love to program Loaded Carries.
Here’s the thing, everyone tries to overcomplicate Loaded Carries.
They try to add extra weights, objects, and forms of resistance, when in reality you ONLY need a pair of heavy kettlebells or dumbbells.
The BEST results come from the simple versions of this exercise.
Here are some of my favorite variations:
- Suitcase Carry
- Farmer Carry
- Waiter Carry
- Sandbag Front Rack Carry
- KB Racked Carry
- Overhead Carry
Okay, so we’ve made it to the top, now what?
Well, now you need to APPLY this!
And the best way to do that?
The 30-Day Core Blaster Challenge!
Seriously, this program is SO SIMPLE.
You can do it ANYTIME and ANYWHERE.
And EVERYTHING is programmed for you – exercises, sets, and reps!
Here’s what you’re going to get in the program:
- 30 Days of Core & Butt Exercises in the appropriate sets and reps!
- Written and video demonstrations of EVERY exercise!
- Delivered weekly to you via email!
- A donation to Breast Cancer Research!
Here’s why you need this 30-Day Core Blaster Challenge:
- It works your ENTIRE core so you can target all of your problem areas which means you walk away with your BEST core!
- It takes 10-minutes per day so you can lean out your core which means you don’t spend HOURS training in the gym!
- It gives you a variety of core and glute exercises so you can mix it up which means you don’t get bored during training!
- It explains and demonstrates all the exercises so you know EXACTLY what to do which means you spend more time working out and less time wondering what to do!
- It leaves you feeling stronger and refreshed so you don’t feel too sore which means you can keep up with the rest of the parts of your day!
Get yourself signed up HERE -> 30-Day Core Blaster Challenge

About The Author

Jordan Davies is the Co-Owner of Complete Performance. Jordan has her B.S. in Exercise Science and Psychology, and her M.A. in Holistic Health Studies. She is a CSCS certified strength and conditioning coach, and a PN-1 and NCI-1 certified nutrition coach. She loves to study how the human body needs to be moved and nourished and making that fit to your unique lifestyle. Click Here Now to Apply for Coaching with Jordan.


