
Did you ever feel like you didn’t fit in as a teenager? Like your body just didn’t look or feel like the rest of your classmates?
WHO DIDN’T!?
It doesn’t help when everyone TALKS about how you look different!
I HATED being a teenage girl.
“She’s stocky.”
“You’re just a little bigger than the rest of the girls.”
I always had to make sure my shorts were long enough to cover my tree trunk thighs.
I was embarrassed to sit on my heels because I didn’t want everyone else to see how big my quads were pressed against my legs.
Whenever we had to sit on the floor in a circle, I used every excuse to NOT sit on my legs.
It hurt my knees and ankles.
My legs were sore from practice or games.
I could see better if I sat up tall.
For as long as I can remember, I’ve tried to slim down my thighs and to look more “normal,” but no matter what I tried, it just didn’t work.
Now, it’s to say I LOVE my legs now, but I appreciate them.
I can see muscle.
I see they get stronger week in and week out in my training.
And I see that they’re leaner (and with less cellulite) than ever.
How did I get there?
By using 5 variations of Quad-Dominant exercises that you can EASILY apply to your training. Let’s check them out.
Squats
One of the oldest and most common exercises in training programs!
While there are SO MANY variations of squats out there, it’s an exercise that can be poorly executed and do 1 of 2 things:
- Cause pain (Short & Long-Term)
- Reduce Your Chance for Results
So how can you do it right to make those quads slimmer and leaner?
![]()
Take a look at these pictures. In the first, I’m standing in a feet slightly wider than shoulder-width distance (not seen in a profile view). My toes are turned out slightly with the shoulders stacked on top of the ankles, knees, and hips. In the second picture, I’ve lowered into the squat by turning the thighs out, opening the hips, and lowering the sit bones towards the floor. I’ve maintained a neutral spine position. My knees have been pushed towards my toes, but my heels remain planted on the floor. From this position, I’d drive through the middle of the foot, squeeze the glutes, and raise the sit bones back to a standing position.
Check out a video demonstration of Squats by CLICKING HERE!
A picture speaks a thousand words, and a video says even more, but here are some additional coaching cues to keep in mind as you look through these:
- Widen your feet to a stance that’s comfortable desired for your results.
- Adjust your toe angle based upon your foot positioning (the wider your feet, the more you turn out your toes).
- Brace your core and spine by taking in a big breath and tightening the muscles of your core.
- Focus your gaze forward.
- Turn the thighs out slightly and push the hips down towards the floor until you are below the knee crease.
- Align your knees over your toes.
- Push your knees out in the bottom position.
- Maintain a neutral spine and lean your torso forward slightly and sit back or remain upright and sit your hips straight down.
- Sit evenly into the middle of the foot, and drive through the heels.
Because squats are so variable, here are few variations broken down based on stance, loading, and equipment.


Split Squats
Squats are great for slimming and trimming the thighs, but if you really want to see some changes to your thighs, you’ll need to spend some time on each leg separately.
The best way to do that is through Split Squats!


Take a look at these two pictures. In the first, you can see I’m set in a split stance position (1 foot stepped back). The front foot is flat on the floor bearing the majority of the weight, whereas the rear foot bears little weight and serves as a kickstand. In the second picture, I’ve lowered the hips towards the floor while still keeping the majority of the weight in the front foot. The knee stays over the middle of the foot and there’s a slight forward lean in the upper body.
CLICK HERE for a video demonstration!
Here are some coaching cues to go along with these pictures and video:
- Determine whether you want a hip or knee dominant form.
- Hip Dominant: take a long, stride, keep your lead shin vertical, and tilt your torso forward.
- Knee Dominant: take a short stride, allow your knee to move forward, and keep your torso upright.
- Position your hands on your hips, at your chest, down at your sides, or extended out in front of the body.
- Maintain a neural spine, a forward gaze, and an upright torso.
- Keep your hips square and even.
- Keep your knee aligned with your front foot.
- Drive off your front heel.
Just as there are MANY variations of squats, check out some of these split squat variations:


Step Ups
Another great way to isolate each leg is through Step Ups!
Often times, Step Ups are a preferred exercise for a few reasons:
- Functionality – In order to live day-to-day, you must have the strength and mobility to step up and down off of surfaces.
- Less Stressful – Many find step ups to be less stressful on the back, hips, and knees.
- Desire – I don’t find too many clients REQUESTING split squat variations 😉


In picture #1, I’m standing in front of a bench (boxes or solid objects roughly knee height work great!). My ENTIRE foot has been placed on the box, and the knee is over the middle of the foot prepared to stand up in a safe movement pattern. In picture #2, I’ve driven through the midfoot to stand up onto the bench. I’ve also pulled the other knee up to a 90-degree position to help engage the core and teach the body to stabilize on one leg.
Here’s a video demonstration of Step Ups – CLICK HERE!
Let’s not forget the additional coaching cues you’ll want to remember as you perform Step Ups:
- Place your whole foot on the box.
- Extend your arms to counterbalance your weight, place them on your hips, or hold down at your sides.
- Align your knee over the middle of your foot.
- Avoid excessively pushing off the ground with your bottom leg.
- Maintain a neutral spine and slight torso lean forward.
- Reach full knee and hip extension at the top of the movement.
Now, you might be wondering how you could possibly vary a Step Up as it seems pretty self-explanatory but check out all these ways you can change things up and continue to slim down and lean out your quads.

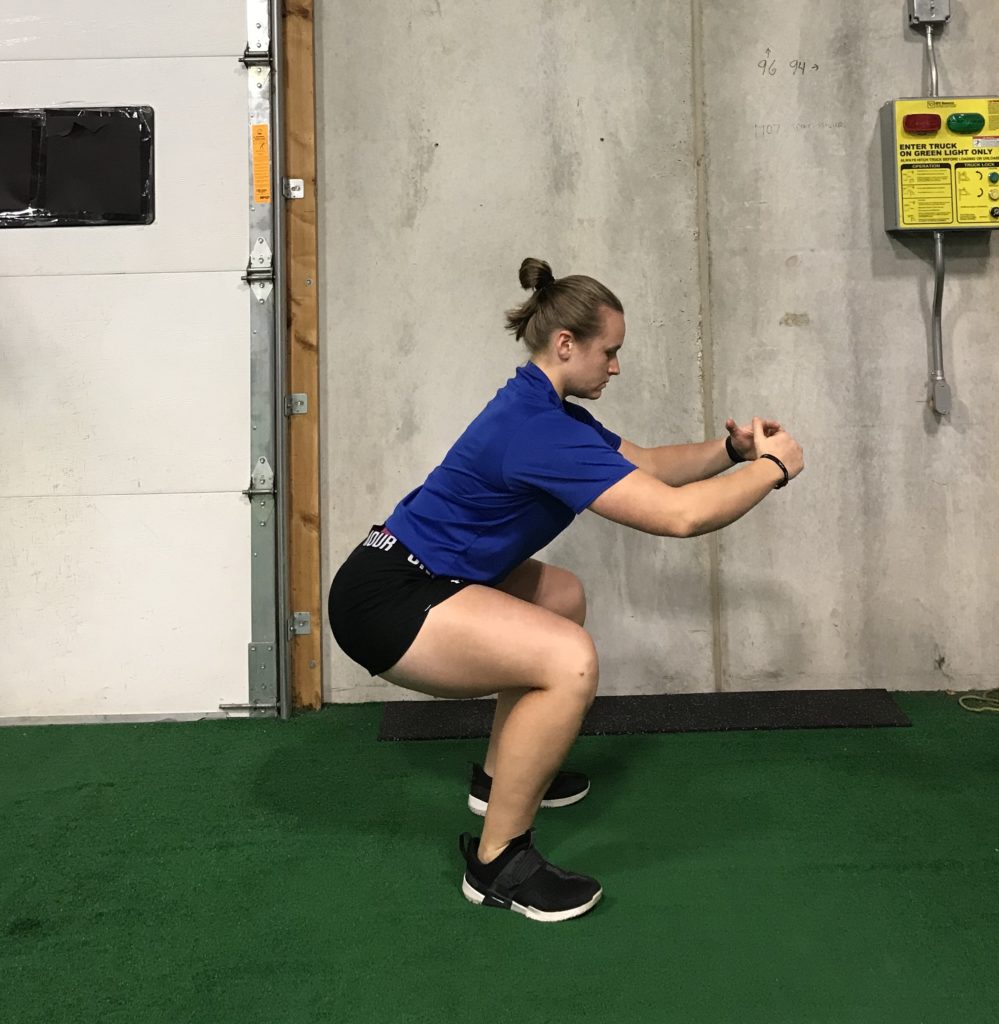
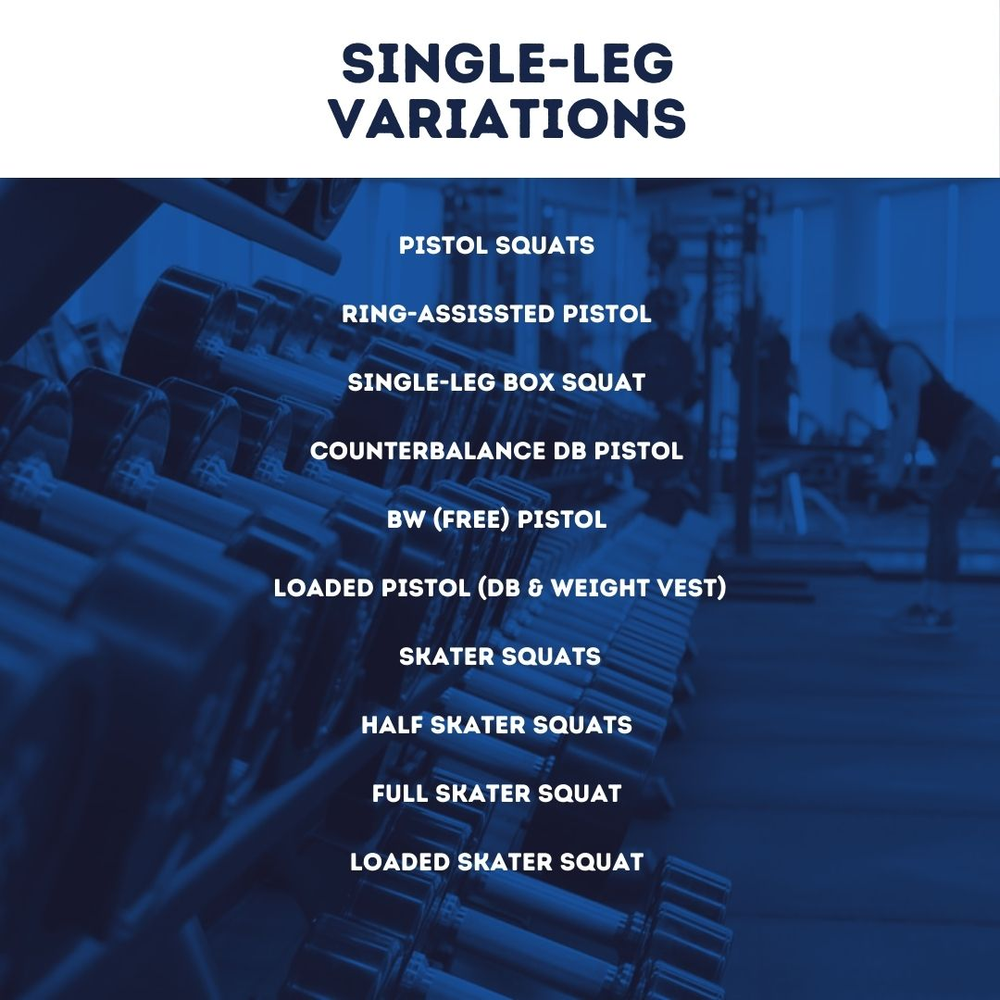
Single Leg Squats
Did you think squats were hard?
How about lunges?
Do you want REALLY hard?
Try Single Leg Squats.
Yikes.
BUT, that must mean they’re great for slimmer and leaner quads, right?
ABSOLUTELY!


Take a look at the pictures. In picture #1, I’m standing balanced on one foot with the other leg fully extended at the knee and held off the floor. Be sure the toe is pointed forward, the weight is in the heel, and the knee is over the ankle. In picture #2, I’ve lowered my hips to sit down on to the box. From this position, I’ll drive through the middle of the foot, keep the knee over the middle of the foot, and extend the hips to return to a standing position.
Before we get to the variations and modifications, here are some coaching cues to keep in mind:
- Keep the foot planted firmly on the floor with the toes pointed forward.
- Maintain a neutral spine with a slight forward lean of the torso.
- Lower the hips keeping them even and square.
- Drive through the heel and keep the knee over the middle of the foot as you return to a standing position.
Now, you’ve been warned that these are a challenging exercise, but here are a list of variations and modifications so you aren’t risking injury and missing out on their benefits.
Sled Pushes
One of my favorites!
Sled pushes have always been an exercise I’ve enjoyed because I can FEEL my quads on fire!

This picture always shows my favorite variation 😉

In this picture, you can see there’s a slight forward lean in my torso but that my spine remains neutral. I’m driving through the toe of one foot, and I’ve driven the knee up towards my chest in the other leg.
Here are some of my favorite coaching cues to provide:
- Choose the variation suitable for your body and goals.
- High-Handle = Glute Dominant at end-range hip extension
- Mid-Handle = Larger range of motion for the glutes.
- Low-Handle = Strengthens glutes in a flexed position and more calf dominant.
- Maintain a neutral spine and keep the shoulders locked into place.
- Drive through the ball of the foot and avoid stretching the ankle to the point where the heel is on the ground.
- Work the hip through a full range of motion given the position.
Finally for some variations so you can head out and give them a try!

By the way, did you know we’re offering an AWESOME challenge to help slim down and lean out your ENTIRE thigh, booty, and core! Check this out!
30 Day Core Blaster Challenge – 30 Days of core (which includes the glutes) exercises planned out for you in a number of variations, sets, and reps. The best part? This is ALL for Breast Cancer Awareness, so you buy this program for life AND Complete Performance donates ALL proceeds to Breast Cancer Awareness.
- CLICK HERE to sign up for the 30 Day Core Blaster Challenge!
About The Author

Jordan Davies is the Co-Owner of Complete Performance. Jordan has her B.S. in Exercise Science and Psychology, and her M.A. in Holistic Health Studies. She is a CSCS certified strength and conditioning coach, and a PN-1 and NCI-1 certified nutrition coach. She loves to study how the human body needs to be moved and nourished and making that fit to your unique lifestyle. Click Here Now to Apply for Coaching with Jordan.


